
Confetti Cake
Recipe from Dessert Person: Recipes and Guidance for Baking with Confidence
by Claire Saffitz
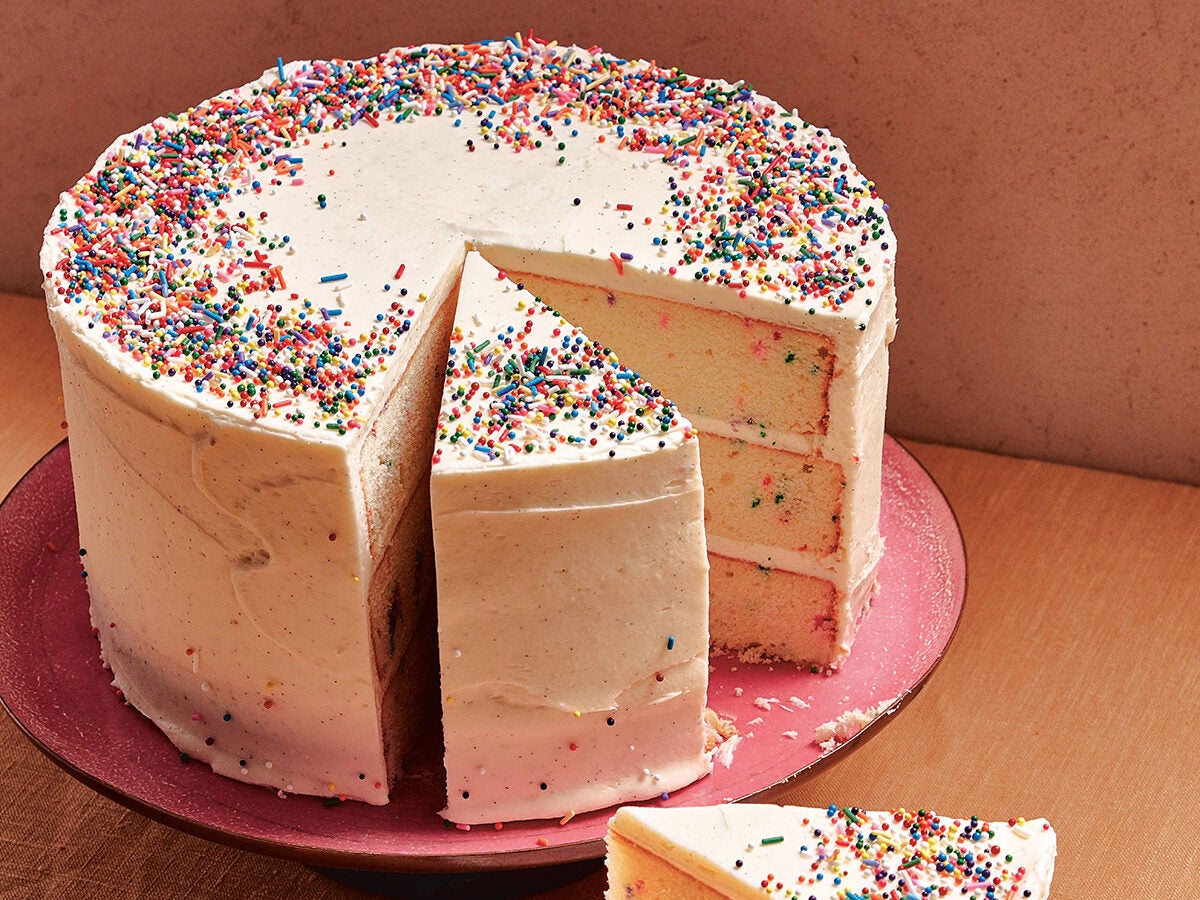
I started my baking career making boxed cake mixes at a young age. I know I’m not alone when I write that my favorite was the Pillsbury Funfetti Cake. It’s basically a white cake with sprinkles mixed into the batter, but the flavor is pure nostalgia. When my sister requested a Funfetti cake for her wedding, I took it as an opportunity to dial in a recipe for a homemade version. This is her cake, scaled to make three generous 9-inch layers.
INGREDIENTS
Special Equipment: Stand mixer, three 9-inch cake pans
Butter for the pans
5½ cups cake flour (23.3 oz / 660g)
2¹⁄³ cups sugar (16.4 oz / 466g)
4½ teaspoons baking powder (0.63 oz / 18g)
1½ teaspoons Diamond Crystal kosher salt (0.16 oz / 5g)
¾ teaspoon baking soda
3 sticks unsalted butter (12 oz / 340g), at room temperature
1½ cups buttermilk (12.7 oz / 360g)
¹⁄³ cup neutral oil, such as vegetable or grapeseed (2.6 oz / 75g)
3 large eggs (5.3 oz / 150g), at room temperature
6 large egg whites (7.4 oz / 210g), at room temperature
1 tablespoon vanilla extract
½ teaspoon almond extract (optional)
½ cup store-bought rainbow sprinkles (3.3 oz / 93g), plus more for decorating
Classic Cream Cheese Frosting (recipe follows)
STEPS
1. Prepare the pans and preheat the oven: Butter the bottom and sides of the cake pans. Line the bottoms with rounds of parchment paper, smoothing to eliminate air bubbles, and set aside. Arrange two oven racks in the lower and upper thirds of the oven and preheat to 350°F.
2. Mix the dry ingredients: In a stand mixer bowl with at least a 5-quart capacity, combine the flour, sugar, baking powder, salt, and baking soda. Mix on the lowest speed with the paddle attachment just to combine (beware of flying flour).
3. Mix in the fat and some of the liquid: Add the butter, buttermilk, and oil and beat on low just until the flour is moistened. Gradually increase the speed to medium-high and beat, scraping down the sides of the bowl once or twice, until the mixture is completely smooth, about 1 minute.
4. Whisk the egg mixture and add the remaining ingredients: In a medium bowl, thoroughly whisk the whole eggs, egg whites, vanilla, and almond extract (if using) until no streaks remain. With the mixer on medium-low, add the egg mixture to the flour mixture in 2 additions, beating well after each addition. Increase the speed to medium and continue to beat until the batter is very light and thick, about 2 minutes.
5. Fold in the sprinkles: Remove the bowl from the stand mixer and add the sprinkles; fold them into the batter with a large flexible spatula to distribute evenly. Try not to mix too much or the color of the sprinkles will start to bleed.
6. Fill the pans and bake: Scrape the batter into the prepared pans, dividing evenly (for uniform layers, use a scale and weigh out 1 lb 12 oz / 785g batter per pan). Smooth the batter in an even layer all the way to the sides. Transfer the pans to the oven, placing two on the upper rack and one on the lower rack, staggering so the pan below doesn’t have another pan directly above it. Bake until the tops are golden brown, the centers spring back when pressed, and a cake tester or toothpick inserted into the centers comes out clean, 35 to 40 minutes, switching racks and rotating the pans front to back after 30 minutes.
7. Cool the cakes and level the layers: Remove the cakes from the oven and let them cool completely in the pans, then use a small offset spatula or paring knife to cut around the sides. Invert onto a wire rack, remove the parchment paper, then reinvert the layers onto a cardboard cake round or cutting board. Use a long serrated knife and long, even strokes to slice off the domed tops of the cakes, keeping the blade parallel to the work surface. (Snack on the cake scraps.) This creates level layers for easier stacking and assembly.
8. Stack and frost the cake: Place the first cake layer, cut-side down, on a cake round, serving plate, or cake stand and slide several strips of parchment partially underneath and all around the cake to cover and protect the plate or stand during frosting. Using a small offset spatula, spread 1 cup of frosting over the cake in an even layer all the way to the edges, then top with another cake layer, cut-side down, and cover with another 1 cup frosting. Place the third layer on top, cut-side down, and cover the top and sides of the entire layer cake with another 1½ cups frosting in a very thin, even layer. This is the “crumb coat,” which is just a base layer of frosting, so don’t worry if the cake shows through in several places. Refrigerate the cake until the frosting has hardened, 10 to 15 minutes, then cover the top and sides of the cake with the remaining frosting. Decorate the outside of the cake with more sprinkles.
Serve: Slide the parchment strips out from underneath the cake and let it come to room temperature before slicing.
DO AHEAD: The cake, well wrapped and refrigerated, will keep up to 3 days. Once frosted, refrigerate the cake until the frosting is hardened and then cover loosely with plastic wrap. Allow the cake to sit at room temperature for several hours before serving. The cake layers, covered tightly and stored at room temperature, will keep up to 2 days or can be frozen up to 3 weeks. When you’re ready to use the layers, frost them frozen, then refrigerate the assembled cake loosely wrapped until the layers are completely thawed, at least 24 hours prior to serving.
CREAM CHEESE FROSTING
Special Equipment: Stand mixer
2 sticks unsalted butter (8 oz / 227g), at room temperature
1 pound (454g) full-fat cream cheese, preferably Philadelphia, at room temperature
Generous pinch of kosher salt
1 pound (454g) powdered sugar (about 3½ cups), sifted if very lumpy
Seeds scraped from 1 vanilla bean or 2 teaspoons vanilla extract
1. In all my years of cake making, I have yet to try a plain or vanilla-flavored European buttercream that beats the deliciousness of good old American cream cheese frosting. Don’t give me a piece of carrot cake, red velvet, or coconut cake covered with anything else. This recipe is sweet but not saccharine, and well balanced by the tang of the cream cheese.
2. Make the frosting: In a stand mixer fitted with the paddle attachment, beat the butter and cream cheese on medium-high, scraping down the sides of the bowl occasionally, until the mixture is completely smooth. Turn off the mixer, add the salt and all of the powdered sugar, and cover the bowl of the mixer with a clean kitchen towel (to shield you from powdered sugar plumes). Pulse the mixer on low several times to incorporate the sugar, then remove the towel and beat the frosting on medium-high, scraping down the sides once or twice, until the frosting is light, thick, and very smooth, about 1 minute. Beat in the vanilla seeds. The frosting is now ready to use.
ABOUT THE BOOK
Dessert Person
Recipes and Guidance for Baking with Confidence: A Baking Book
Claire Saffitz
IACP AWARD WINNER • NAMED ONE OF THE BEST COOKBOOKS OF THE YEAR BY The New York Times Book Review • Bon Appétit • NPR • The Atlanta Journal-Constitution • Salon • Epicurious
“There are no ‘just cooks’ out there, only bakers who haven't yet been converted. I am a dessert person, and we are all dessert people.”—Claire Saffitz
Claire Saffitz is a baking hero for a new generation. In Dessert Person, fans will find Claire’s signature spin on sweet and savory recipes like Babkallah (a babka-Challah mashup), Apple and Concord Grape Crumble Pie, Strawberry-Cornmeal Layer Cake, Crispy Mushroom Galette, and Malted Forever Brownies. She outlines the problems and solutions for each recipe—like what to do if your pie dough for Sour Cherry Pie cracks (patch it with dough or a quiche flour paste!)—as well as practical do’s and don’ts, skill level, prep and bake time, step-by-step photography, and foundational know-how. With her trademark warmth and superpower ability to explain anything baking related, Claire is ready to make everyone a dessert person.
Sign up for the Random House List for book release info, news, excerpts, events, giveaways, deals, and more from our corner of the House.